The single best thing you can do to reduce cybersecurity risk in your environment is to prevent and mitigate social engineering – phishing in particular. The first and best thing any IT security administrator should do is to prevent social engineering and phishing from getting to their end users, as best they can. It requires the best, defense-in-depth combination of policies and technical defenses.
If you are interested in everything you can possibly do to mitigate phishing, check out our anti-phishing e-book or phishing mitigation webinar, both dedicated to fighting phishing.
But no matter how much you try to prevent social engineering and phishing from getting to your end users, some amount of it will end up in the user’s inbox, browser or phone. No preventative defense has yet to defeat phishing attacks. Because of this, all end users should be trained to spot social engineering and phishing which made it past preventative controls – and taught what to do (which is hopefully report and delete).
There are times when an end user will receive an email or a website pop-up (or a message over some other media channel like a text message or voice call), where it is not readily apparent if the message is a social engineering or phishing attack. In those cases, the end user can try to look for clues which will better help them determine the legitimacy or report that potential phishing instance to someone else who can conduct an investigation. If the legitimacy cannot be determined, the phishing attempt should be ignored, reported and deleted. “When in doubt, chicken out!”
But in most cases, the social engineering and phishing instance can be investigated by the end user or the appropriate IT person to determine legitimacy. Here are the steps anyone can take to forensically examine a social engineering or phishing attack.
- Investigate the Body of the Message
Of course, the body of the message gives the most clues. If the message is unexpected and requests an action from the receiver that the receiver has never done before for the sender, it should be highly suspect (even if coming from a trusted person and valid email address). The requests can be a hundred different topics. The most common phishing request is a request for login credentials, usually in response to verifying some other action (such as a fake reported security incident). The second most common request is for the potential victim to open a document, which then tries to run an unexpected executable or some other type of potentially dangerous content. The vast majority of phishing requests involve requests for credentials or to open attached files or to click on embedded URL links.
If the requestor is asking you to log in to a website to verify something, avoid using the URL link supplied in the request. Instead, go to the legitimate website the requestor is referencing, log in to that website and see if the same request is present. If it is not, then usually the request is bogus. Not always, but most of the time. When in doubt, chicken out.
Any unexpected requests to open a document should first be verified some other way, such as calling the requestor on a previously known or legitimate phone number. Never call a requester to verify something using the phone number supplied in the message. Those included numbers often lead to fake companies with fake receptionists. - Spot the Red Flags of Social Engineering
The vast majority of phishing emails include visible clues that the message is rogue and not legitimate. Typos and obvious signs that the sender is not familiar with your language are still very common. The other most common sign is that the sender’s name and included email address and reply address are often very different (known as sender address disagreement). The figure below is a great example: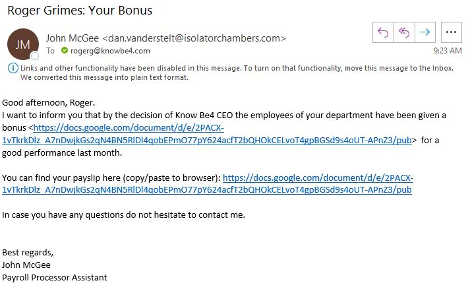
It claims to be from John McGee, but the sending email address is clearly tied to Dan Vanderstelt. I am never sure why the sender does not try harder to make sure the fake name they are using matches the email address they are using. Must be too difficult to synchronize email addresses with the correct associated names given the amount of phishing emails they are sending using automation tools.
KnowBe4 has a great “Social Engineering Red Flags” PDF that you can review and send to anyone. Shown below, it includes over 20 different common signs of social engineering. It is a great summary PDF. You can find a longer blog article where it is discussed here.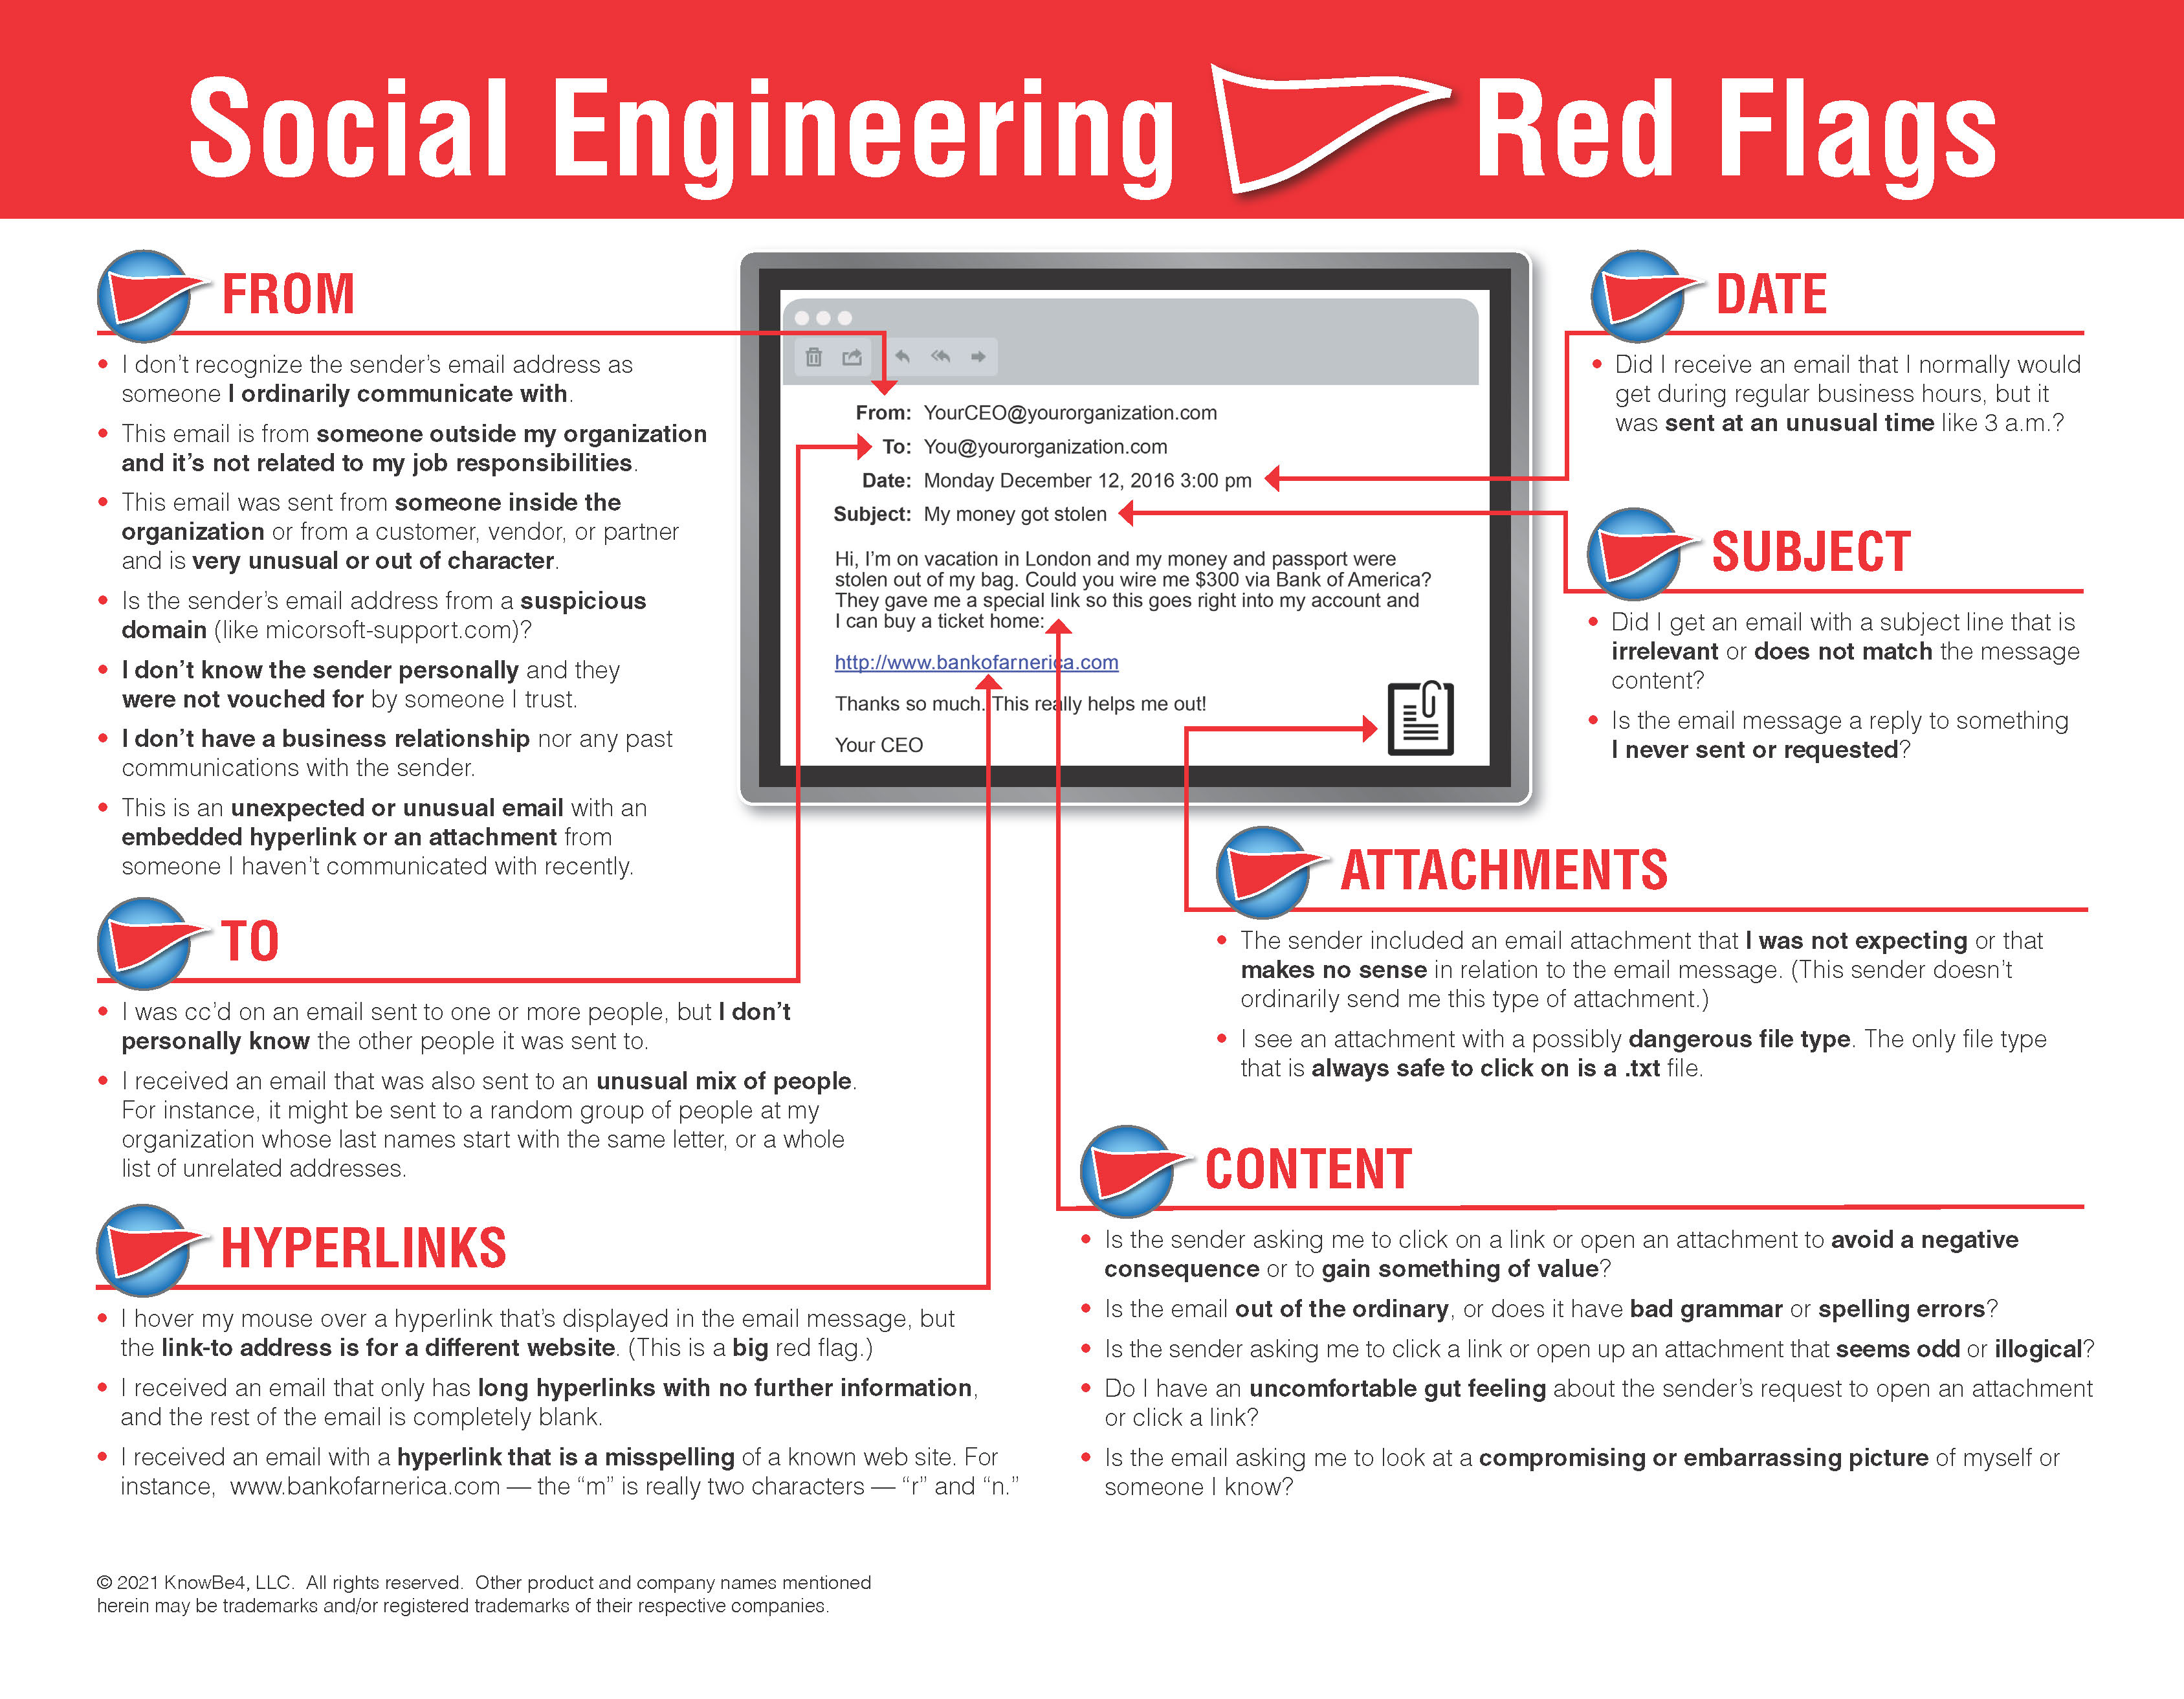
KnowBe4 also has a great PDF summary of common rogue URL tricks (shown below) here: . A longer blog article giving more detail to the rogue URL tricks can be found here.
I want to be clear. The best thing to communicate to employees about watching out for phishing and social engineering, is to be very suspicious about any unexpected email or request, even if it is coming from a known and good email address or website. They should be especially cautious if the email is asking a potential victim to do something potentially dangerous to their own account or company.
For example, I go to a website I love and trust and visit all the time. And this time, for the first time ever, it tells me that I need to upgrade some software program to view content on the website. If this is the first time this website has ever asked me to do it, and it is unexpected, be very suspicious.
Phishing can actually be more difficult to recognize. Sometimes the request is coming from someone you know and trust, and they are asking you to do something you have been waiting on, such as wire money to a bank as an escrow payment during a mortgage loan approval process. Computers in escrow companies have been compromised and the attacker sends the payment information to a waiting recipient and all the information in the email is expected, but the only fraudulent, changed information is the wiring instructions. These types of phishes are edge cases. In the case of mortgage escrow fraud, all recipients of wiring instructions should always call the escrow company at their legitimate, verified phone number, to confirm all of the wiring instructions first.
By following the previous rule, “Be very suspicious about any unexpected email or request, even if coming from a known and good email address or website, asking a potential victim to do something potentially dangerous to their own account or company”, any potential victim can diminish the most risk for the majority of social engineering phishing cases. - Review Email Headers
There will be times when the request and text of the email is not enough to determine legitimacy. When this happens, the next thing to do is to look at the email’s headers. Every email has header information, which if viewed, can reveal useful information. Every email client has different ways to view the email header information.
For example, to see email headers in Microsoft Outlook, open any email then choose File, Properties, Internet Headers (see example below). See email headers in a browser while using Google Gmail, Open email, click on three dots on right, and click on Show original. No matter how I get to the header, I usually copy it to a text document for easier viewing and searching.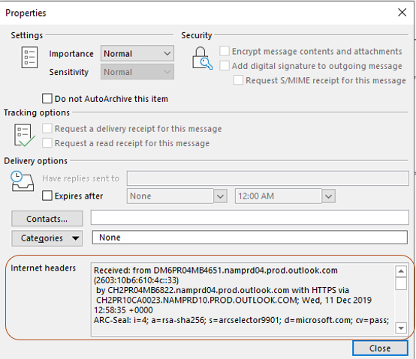
Email headers are always very messy, “noisy”, things (see image below).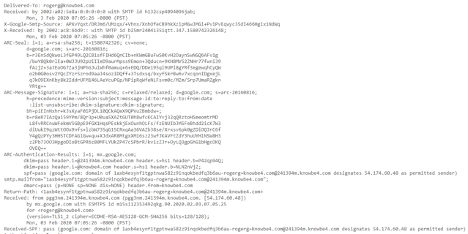
They are full of nearly incomprehensible technical and routing information. For those of us who read them routinely, they mostly make sense. We know what to ignore and what is important. For anyone new to them, they can be a bit daunting. Here are a few rules:
First, most servers and services which help in routing an email from source to destination (known as mail transfer agents or MTAs), add information to an email’s headers. They do not have to, but most do. Second, the information in the header is usually shown last in first out, meaning the earliest information is earlier on in the header information. The top of an email header is from the latest MTAs and the information from the first MTA is near the bottom of the header. Third, any MTA can modify another MTA’s email header information or post fraudulent information into a header. So, ultimately you cannot trust what is in an email’s header. With that said, 99% of the time, an email’s header information is valid and legitimate. Just always keep in the back of your mind that they can be falsified and you can never truly rely on them.
The first thing I usually do when reviewing an email header is to look for the SPF, DKIM and DMARC header information, if it exists in the header. It usually does. SPF, DKIM and DMARC are acronyms for global phishing standards. They exist to determine if an email claiming to be from a certain domain were really from an email server authoritative for that domain.
Note: If you want to learn more, you can watch my one-hour webinar about SPF, DKIM and DMARC
Suffice to say, if SPF, DKIM and/or DMARC records exist, you want them to say “pass” versus “fail”. See some examples below. The first image is of an SPF record that passes: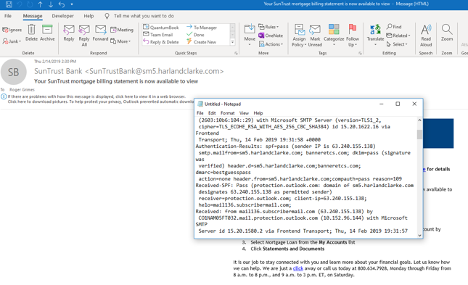
This next record is of an SPF record that fails: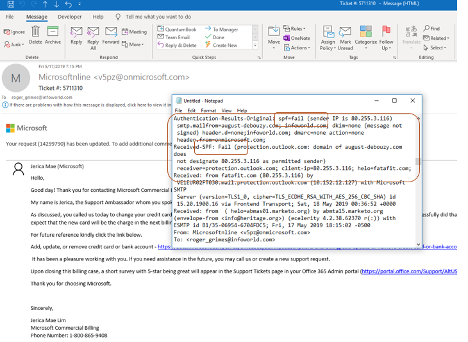
The next figure below is of a DKIM record indicating a pass: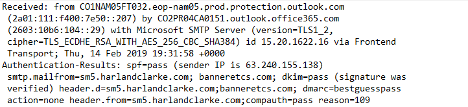
The next figure below is of a DKIM record that failed: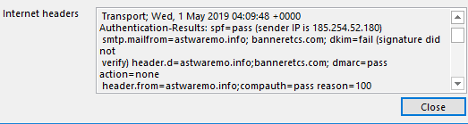
There can be other findings, such as “None” or “Neutral”, usually indicating that SPF, DKIM and/or DMARC records were not found. A failure can also be because someone did not configure their SPF, DKIM and/or DMARC records correctly, but if I see “pass” and “verified”, then I at least know that the domain that the email claims it was from, it really was from.
There is a lot of other information that can be gleaned from an email header, especially IP addresses and domain names. The only ones that really matter are the first one shown at the bottom of the email header. In particular, I look for the first “Received:” listing at the very bottom of the header:
As you can see in the figure below, there are multiple “Receive:” labels, but we are interested in the very bottom one. That is the email server or MTA that first sent the email. You may also see “X-Originating-IP” (as shown below). It may be in place of a “Received” label.
Either way, the first (at the bottom) “Received” or “X-originating-ip” label will tell you the first sending server or service. That is who sent it originally. You can then use other “lookup” services to convert the IP address or domain name into physical location or company owner.
For example, in the sample shown below, the sending domain was te.team-admin-net with IP address 185.62.190.159: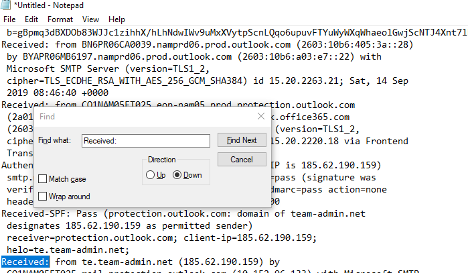
I used an IP address lookup service (they are all over the Internet) to learn that the IP address is located in Russia: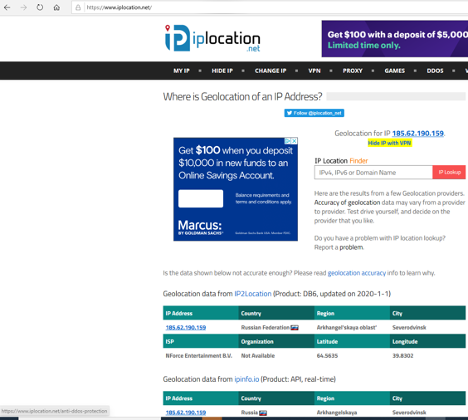
This email was claiming to be from Microsoft, which is based in Redmond, WA. Russia is a hotbed for malware and ransomware. Knowing nothing else, I would be very suspicious of the email. - Use Other Tools
In general, I tend to run a handful of investigative “lookup” services on any found IP addresses or domain names. One of the most popular free and commercial lookup services is Mxtoolbox. Their “Super Tool” lookup is everything most people would need to look up public information about an IP address or domain name. Here is an example screenshot I took when researching a domain name (googlechromeupdates.com) that arrived on a confirmed phishing attack email claiming that I need to update my Google Chrome browser using their file attachment: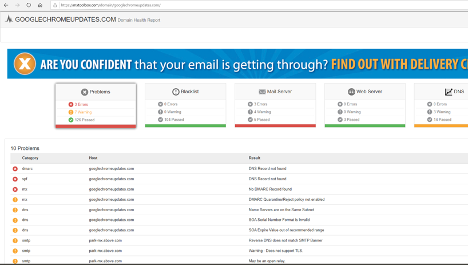
I am a big fan of “blacklist” checks, which will look to see if the domain you are typing in was previously reported as malicious to one of the many dozens of global blacklist services: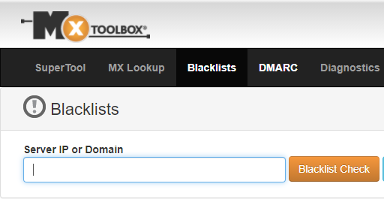
New malicious domains are usually not on blacklists. It takes a few days to weeks for them to appear, but it is a quick check. And occasionally, it actually shows me that the questioned domain is on someone’s blacklist. The following example shows this: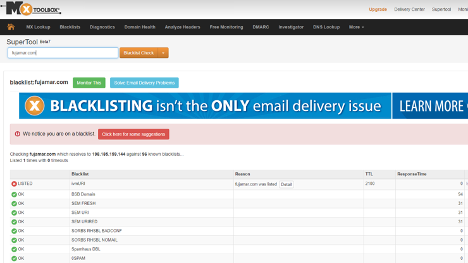
- Test Launching Content Safely
If the suspected email contains a file attachment or URL, you can always try opening it on a “safe”, isolated virtual machine (VM), which contains forensic software to help me analyze it. Any time I get a potentially dangerous email or URL, I send it to my “throwaway” dummy email account created solely for me to send dangerous stuff to. Then I open that email in my safe, isolated virtual machine, and see what my forensic software shows.
It is important that you never execute content or click on a suspected URL link on your regular computer. Content and links can exploit your device or software. Yes, one click can lead to a compromised computer. Instead, for suspected stuff, open it up on an isolated computer or isolated virtual machine. The latter is what most forensics investigators do now.
Example virtual machine software includes:
- VMware
- Microsoft Hyper-V
- Oracle Virtual Box
- Windows 10 Sandbox
- Amazon Workspaces
Whichever virtual machine software you use, make sure it is “isolated” from your regular network, with at most, only the ability to connect to the Internet. You don’t want malware or hackers accidentally getting access to your regular, production, network. Make sure any logon accounts and passwords you use are different than any you use for your other work. For example, I create “throwaway” email accounts in Hotmail and Gmail that I only use for picking and playing with social engineering malware, URLs, and file attachments. That way if a hacker or malware is able to “steal” my password(s) or take over my account, I’m no worse for the wear, and my regular corporate network is not threatened.
Note: Some malware programs, if they detect they are running in a virtual machine environment, will exit prematurely or change their behavior to be seemingly more innocent.
Your virtual image should have forensics software installed to help investigate whatever badness you are running on the virtual machine. There’s a lot of forensic software out there you can use. What forensics software do I use? I love free stuff. I’m a big fan of anything Microsoft’s Sysinternals site. It has dozens of free, diagnostic, forensic program. I think most forensics investigators especially love Process Explorer, Process Monitor, and Autoruns. Those three programs are worth their weight in gold. Process Explorer is good for seeing what executables are running and you can check them against Google’s free VirusTotal website, which compares any submitted file’s hash to ones scanned and recognized by over 70 antivirus engines. If more than two VirusTotal AV engines recognize a submitted file as malware, it probably is malicious. If only 1 or 2 of the over 70 AV engines identify a submitted file as malicious, it may be a false-positive.
Here are some example recaps of forensic investigations I did using safe, isolated VMs and Sysinternals software:
- My Morning Facebook Phishing Scam
- Phishing Malware Vanishes in 2 Seconds
- Phishing Example 1
- Phishing Example 2
This is email phishing forensics phishing 101. If I get an email, it is the steps I take, and you can take, to quickly determine maliciousness or legitimacy. If I can’t determine if an email or URL is legitimate or not within a few minutes (and after making a few phone calls), I forward it to the IT security team to review and I delete it (all at once using my Phish Alert Button).
With that said, I think anyone can determine the legitimacy of 95% or more of emails by following the simple steps above. Enjoy your threat hunting!
Webinar: Learn How to Forensically Examine Phishing Emails
Cyber crime has become an arms race where the bad guys constantly evolve their attacks while you, the vigilant defender, must diligently expand your know how to prevent intrusions into your network.
In this webinar, Roger Grimes, KnowBe4’s Data-Driven Defense Evangelist, shows you how to become a digital private investigator! You’ll learn:
-
How to forensically examine phishing emails and identify other types of social engineering
- What forensic tools and techniques you can use right now
- How to investigate rogue smishing, vishing, and social media phishes
- How to enable your users to spot suspicious emails sent to your organization
- Get inside the mind of the hacker, learn their techniques, and how to spot phishing attempts before it’s too late!

PS: Don't like to click on redirected buttons? Cut & Paste this link in your browser: